An exploited CMS vulnerability or vulnerabilities to web-based attacks is a big security issue as one well-aimed attack can cause a data leak, data loss or make your server unavailable. These attacks need to be stopped before they even reach your server and the WAF 2.0 module can do that for you. This powerful defense tool can protect you from these attacks without slowing down your server’s response time or increasing the load.
In this guide, I will show you how you can use it to maximize your server’s protection by fine-tuning this module.
Spoiler: not by turning on every WAF rule 😉
In this article, I will answer the most important WAF-related questions:
WAF Stands for Web Application Firewall. This powerful module blocks attacks that target websites by patching your CMS’ vulnerabilities, such as WordPress, Drupal or Joomla. The WAF 2.0 module can block attacks that would potentially cause serious issues with only one successful attempt. Well-targeted code injections or cross-site scripting attacks need only one successful attack to damage your server. The WAF module’s reverse proxy filters all requests before they reach your server, so these attacks will be blocked. While the other BitNinja modules block attacks that need multiple trials, like DoS or brute force attacks, SQL injections or Hexa botnet attacks need to be stopped before they can reach your server and the WAF 2.0 module is perfect for that.
In this article, I will show you how you can utilize this powerful module and how you can use its full potential with some fine-tuning.
The BitNinja WAF 2.0 module protects your server from:
The current WAF 2.0 module was first introduced in the 1.17.0 version in the BitNinja agent’s source code as WAFManager. The 1.0 version of our Web Application Firewall was PHP-based and required a lot of resources to run and adding a new rule usually increased the resource demand of the old WAF module. So, we replaced it with an Nginx reverse proxy-based modsec (v3) framework which uses the OWASP core ruleset. This way, the WAF 2.0 module is fast and uses minimal resources and it is easy to add rules from the ruleset without anything slowing down or increasing the server’s load. No other WAF module has pattern-based rule management, only the BitNinja WAF 2.0 module.
| WAF 1.0 | WAF 2.0 |
|---|---|
| PHP-based | Nginx reverse proxy-based |
| Causes slower response | Has no effect on the speed of your website |
| Increases the server’s load | Uses minimal resources |
| Hard to add rules | We can add new rules to patch new kinds of vulnerabilities |
| Rules can be applied on server-level only | Rules can be applied on domain/page-level via the domain pattern system |
This module is disabled by default because the necessary configurations vary based on your setup and infrastructure. To use BitNinja’s WAF 2.0 module, you will need to make sure the pre-configurations are done based on how you use your servers. If you use any CDN services, for example, or any proxy service, you will need a different configuration than if you use no proxy or CDN. But don’t worry, I will guide you through how to execute these simple configurations. In this article, I am going to explain which setup requires what configuration. I will also tell you how to minimize the false positive rate with this module.
As the BitNinja WAF 2.0 is a reverse proxy, every HTTP(S) connection comes through it. So, in order to see the real IP (and not the server’s IP) in the access logs, you need to enable the X-Forwarded-For header or enable the Transparent proxy module depending on your set up.
The required settings vary if you use any CDN or proxy service or if your server has private IP addresses only and the web server (Apache, Nginx) that you use to host your domains also affects the required configurations.
You can check if your server is behind Proxy by pinging the server’s hostname.
1. If you see the server’s IP address* or one of the IP addresses of your server, then your server is not behind any proxy.
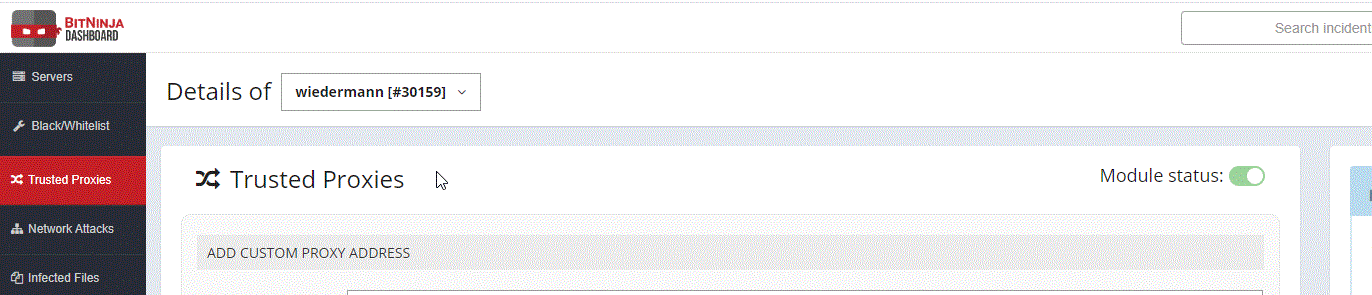
2. If you don’t see the IP address* of your server, you are behind a proxy and you will need to enable the Trusted proxy module
and set up the X-Forwarded-For header.
If you are hosting multiple domains and you are not sure if any of the domains use CDN services, you need to check the domains to see if they are behind Cloudflare, for example.
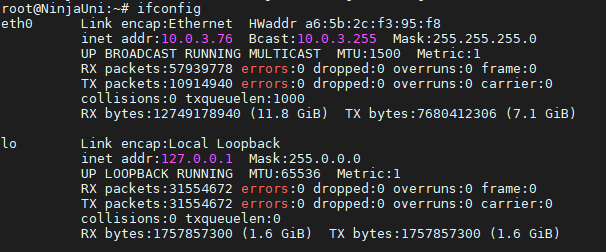
*You can check your server’s IP addresses with the ifconfig command.
How can I tell if I have private IP addresses only?
The output of the ifconfig command contains IP addresses that look like:
As you can see, the NinjaUni server has only private IP addresses.
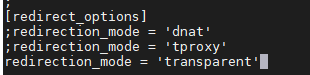
If you only host domains without Cloudflare or any other CDN service and not use the Trusted Proxy Module, all you need to do is enable the Transparent proxy module.
You can enable the Transparent Proxy module without modifying anything in the web server application that you are using, whether it be Apache, Nginx, Litespeed, or EasyApache.
All you need to do is:
After that is done, we can test if our WAF module is working properly.
You just need to add /?test=/etc/passwd
to one of the hosted domains' URL. This will trigger the WAF module as we are trying to access a file from the operating system.
If everything is okay, you should see our CAPTCHA page. Please delist your IP address from the greylist by solving the reCAPTCHA and clicking on the delist my IP address button.
Done, I enabled the Transparent Proxy. Let's see how I can manage the WAF rules.
To enable BitNinja to see the real IP addresses of users that visit a domain that is behind Cloudflare, for example, you will need to enable the Trusted proxy module. This is also the case if you use any other CDN service or proxy. Enabling the Trusted proxy module:
It might be necessary to regenerate and reload the SSL Terminating module after enabling the Trusted Proxy.
You can do that by running these commands with 1 minute in between to make sure that both commands went through:
bitninjacli --module=SslTerminating --regenerate
bitninjacli --module=SslTerminating --reload
Done, I set up the X-Forwarded-For header. Let's see how I can manage the WAF rules.
If you use any CDN or proxy services, you need to enable the Trusted proxy module from the Dashboard.
You will need to set up the X-Forwarded-For header in your web server application since the CDN servers do not have the Transparent proxy feature yet,
they only have the X-Forwarded-For. BitNinja will only see the real IP addresses of the users with the Trusted proxy module on.
If you use any control panel (such as cPanel
) that generates the web server application's config file, it will overwrite the config file if you modify anything in the configuration file directly.
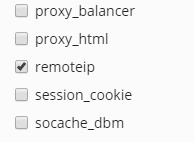
In Plesk, the X-Forwarded-For header is set up by default. If remoteip is not enabled somehow, you need to enable remoteip from the control panel. In the corresponding part, I will show you where you can find this setting.
You need to use the config editor provided by the control panel. You can usually find it by typing the name of the web server into a search field.
Please note that if the web server's config file was generated by the control panel, you will see comments about this in the config file saying something like " DO NOT EDIT. AUTOMATICALLY GENERATED".
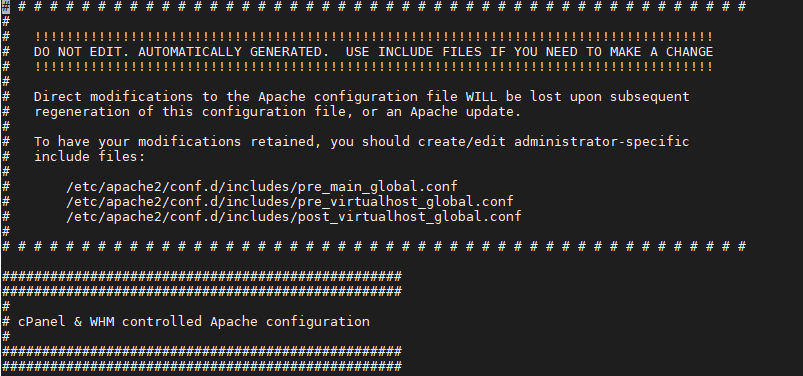
So, if there are no such comments in the config file, you will need to access the Apache web server's config file.
Done, I set up the X-Forwarded-For header. Let's see how I can manage the WAF rules.
In Plesk, this configuration is not necessary as the X-Forwarded-For header is already included with all IP addresses of the server in the configuration files of all web server applications. If remoteip is not enabled yet, you need to enable remoteip from Plesk.
Done, I enabled the remoteip. Let's see how I can manage the WAF rules.
If you see the comments about this config are being generated by cPanel or another control panel, you will need to edit the config file from the control panel's config editor
    RemoteIPHeader X-Forwarded-For
    RemoteIPInternalProxy INSERT YOUR IP ADDRESS(ES) HERE
Done, I set up the X-Forwarded-For header. Let's see how I can manage the WAF rules.
The other most popular web server is Nginx. In Nginx's case, the cPanel plugin Engintron basically gives you an editor for the config files.
If you use CDN or Proxy services, enabling the Transparent proxy is not sufficient and you will need to set up the X-Forwarded-For header and enable the Trusted proxy module.
set_real_ip_from ;
real_ip_recursive on;
Done, I set up the X-Forwarded-For header. Let's see how I can manage the WAF rules.
In this case, you just need to open a terminal on the server and configure the web-server manually and set up the X-Forwarded-For header as shown below.
In CentOS, it is usually located at: /etc/httpd/conf/httpd.conf. In other distributions, it might be called apache2.conf. In Debian, it is usually located at /etc/apache2/apache2.conf. The location of this file is set at compile-time, so it may vary.
You can use the find / -name 'apache2.conf' -print or with find / -name 'httpd.conf' -print command to find the location of the file.
    RemoteIPHeader X-Forwarded-For
    RemoteIPInternalProxy INSERT YOUR IP ADDRESS(ES) HERE
Done, I set up the X-Forwarded-For header. Let's see how I can manage the WAF rules.
After the WAF module is set up, it provides great protection with the default settings but there is so much more potential in this module
In this part, I will explain how the WAF module works and how can you get the most out of the WAF module while minimizing the false positives with some fine-tuning.
As mentioned, our WAF 2.0 module uses the OWASP rules.
We have 3 different predefined collections of rules to help you minimize the number of false positives.
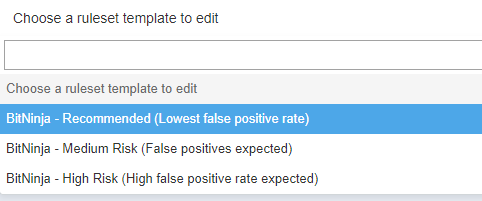
These rulesets can be set up based on patterns. By default, the Recommended ruleset is active on the / pattern, which means the Recommended ruleset takes effect on the whole server, on every domain. If you add any additional rule or disable any rule on the domain, the change will take effect on the domain pattern that you added or disabled the rule on.
For example, if one of the rules causes too many false positives on example.domain.com/admin-page, then you can disable the rule for that pattern only, so you don’t have to compromise the security of other domains where this rule caused no false positives. Managing WAF rules based on domains is unmatched in the security solution’s market.
You can also make your own custom WAF rulesets if you click on the Manage ruleset templates in the WAF 2.0 menu.
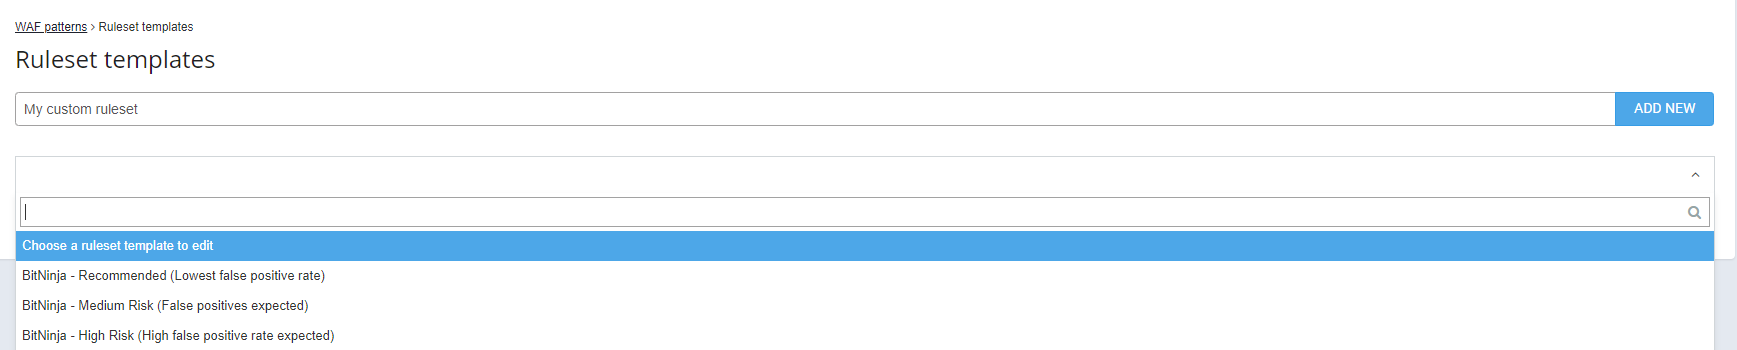
You can select one of the predefined rulesets, then you can select which rules to remove or add to the predefined ruleset. After clicking on the Add New button, you can use this custom ruleset on any of your servers under the account that you are logged in.
From the Recommended to the High Risk ruleset, there are more and more rules that are enabled while the expected number of false positives increases. While switching on all the WAF rules might seem like a good idea to maximize your server’s security, enabling too many WAF rules causes your customers to be blocked for perfectly harmless things like editing their WordPress site or trying to edit something in their admin interface. So, turning on a bunch of rules in the WAF 2.0 module will lead to a lot of frustration from your customers, which will lead to an increase in the number of tickets, which consumes a lot of resources and precious time.
We advise you to use the Recommended ruleset because it contains all the rules that are necessary and rarely causes any false positive. If you would like to enable a rule on a domain that is not included in the recommended ruleset, please use the rule in “log only” mode to see how each rule performs, so you can decide which rules will work for you and which won’t. This way, if a user triggers the rule, they won’t be blocked but you can check the logs regarding the WAF rule if it was triggered false positively.
As the default pattern, “/” takes effect on the whole server, only use the Recommended ruleset. Using the Medium Risk ruleset or the High Risk ruleset is not recommended as it will increase the false positive rate generated by the WAF 2.0 module a whole lot.
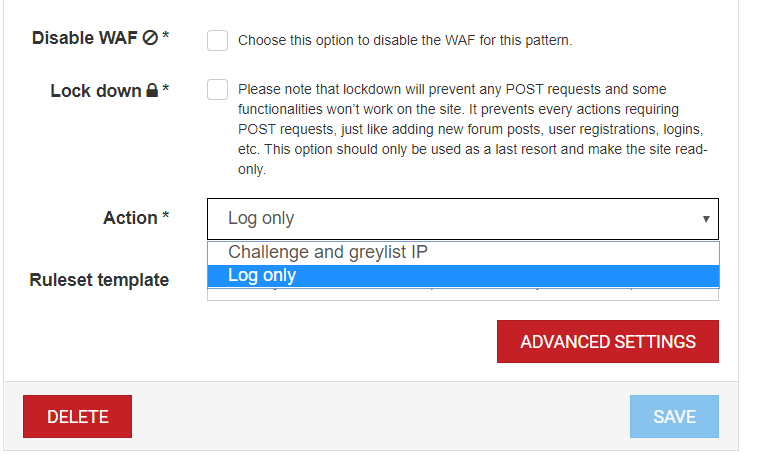
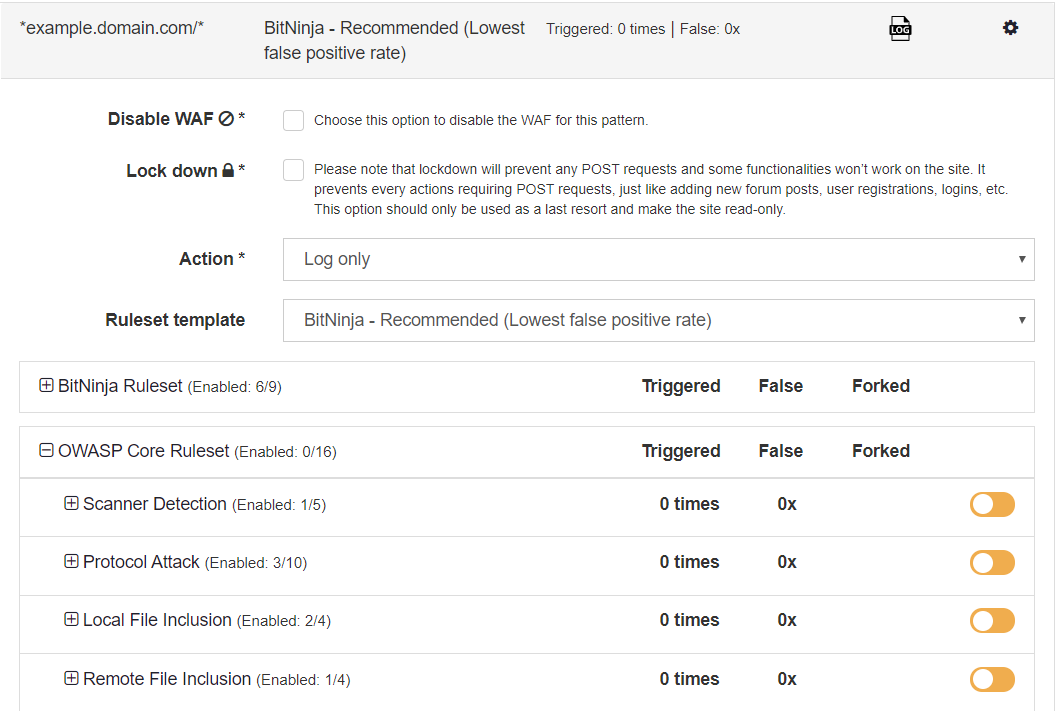
If you click on the Advanced Settings
button, you can select which rules to enable or disable. You can expand the BitNinja Ruleset or the OWASP Core Ruleset to turn on or off rules. The rules are grouped in collections. You can enable and disable WAF rules by groups. I will explain this feature in detail here
.
We only recommend this setting if you know what you are doing and you are confident about what rule you would like to enable. If you are not sure or you have questions, please don’t hesitate to contact us via chat or via email and we will be more than happy to help you.
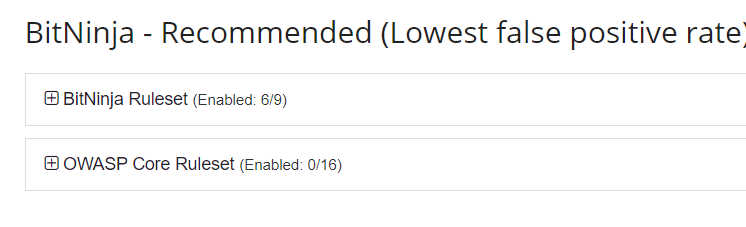
In the BitNinja WAF ruleset, 6 out of 9 rules of this ruleset are enabled by default.
Our tech ninjas made these rules to patch CMS vulnerabilities and zero-day vulnerabilities and they are working continuously to make this rule collection bigger and patch even more vulnerabilities with the WAF module.
The Virtual Honeypot rule group enables you to make any backdoor or page to a honeypot without any coding whatsoever. All you need to do is set this rule to the path you find a backdoor or the page where it was uploaded from or where the hackers tried to upload it. You can read more about this ruleset in our previous blog article.
The BitNinja ruleset contains the following rules:
Of course, the OWASP Core Ruleset patches a lot of CMS vulnerabilities as well, for example, as you can read in one of our recent articles.
If you would like to read about our WAF 2.0 modules’ ruleset, please check out this article. Also, you can read more about the rules by expanding the rule categories. There will be a short description of the rules. Some rules also have a link with references in their descriptions.
Our WAF module is the only one where you can manage rules by domains or even pages.
Pattern-based WAF rule management is useful because you can avoid false positives much more easily without risking other pages or domains where this rule caused no false positives, or you can protect pages and domains with additional rules where it is necessary without risking an increase of false positives and tickets.
By default, the Recommended ruleset is active on the “/” pattern. This means that the recommended ruleset is active on every domain and every page hosted on the server.
A great benefit of the domain-based rule management is that you don’t have to specify rulesets for every domain if you would like to protect a URI that is available in many domains. If you would like to get rules to every WordPress admin page on the server, you don’t have to go through every domain like domain-one.com/wp-admin/ and domain-two.com/wp-admin/ and set the same rules for them one by one. You can get the job done by setting up the rules on a domain pattern that looks like this:
*/wp-admin/*
A pattern is basically a regular expression. The * character is a wildcard, so it means any number of any character. It’s important that before the first /, there is the domain information and after the first /, you can type the URI.
Here are some examples of the different kinds of domain patterns:
| Pattern | Exact subdomain | Exact domain | Exact URI | |
|---|---|---|---|---|
| 1 | *ninjas.com/* |  |
 |
|
| 2 | *.ninjas.com/* | (but applies only on subdomains) |
|
|
| 3 | *cool.ninjas.com/* | |
|
|
| 4 | *cool.*/* | |
|
|
| 5 | *cool.ninjas.com/wp-admin/* | |
|
|
| 6 | *ninjas.com/wp-admin/* | |
|
|
| 7 | *phpmyadmin*.ninjas.com/* | |
|
|
| 8 | */wp-admin/* | |
|
|
If you would like to disable or enable a rule on a domain or just one page of the hosted domain, you can do it from the WAF 2.0 menu point of the Dashboard.


1. In the “Action” field, you can select if the WAF module is in Log only or Challenge and greylist IP mode
2. With the Lock down mode enabled, the WAF 2.0 module blocks every POST request on the page where it is set up. If you send a POST request like commenting, you won’t be greylisted, the POST request will be ignored and only GET requests will be processed. That is a useful tool if a user account is hacked, for example, someone has the password and the username of a client. You do not have to suspend your customer’s account, you can just use this mode to:
3. The Disable WAF mode can be used if you want to make sure no request will trigger the WAF module on a domain pattern. For example, if you don’t want the WAF module to be triggered by any request on the WordPress admin pages of a specific hosted domain, you can just add a pattern that looks like this: *example.domain.com/wp-admin/* or if you would like to do that on all the hosted WordPress admin pages, you can use */*/wp-admin/*. Then you can just tick the Disable WAF checkbox. This way, no WAF rule will be triggered here.
When adding rules on a domain or a page, we recommend setting the action on the pattern to Log only mode at first so you can check if the increase in the false positive rate is acceptable. In Log only mode, BitNinja only logs what request and from what IP address triggered the WAF module on the domain pattern, so the users that cause false positives won’t be blocked.
In Log only mode, since triggering a WAF
rule won’t present CAPTCHA and the user won’t delist the IP, the false positives won’t show under the WAF 2.0 module’s menu point. This means you will need to check the logs and validate if the rule causes false positives.
If you decide to enforce the rules of your ruleset, you can just select the Domain pattern and click on the gear icon on the right and at the Action field, select Challenge and greylist IP.
![]()
Here, you can see how many times the WAF 2.0 module was triggered, how many of these were false positive and how many rules were added and if the rule is in Log only mode.
1. The number of false positives is indicated next to “False”. This counts how many requests came in regarding the domain pattern which triggered the WAF 2.0 module but it was delisted right after via the CAPTCHA module. We count this as a false positive because the rule was triggered by a request that was launched by a human user.
2. The “Triggered” number shows how many times there was a request that contained something that is forbidden by a rule.
3. The little fork icon shows how many rules were enabled in addition to the ruleset that was selected. If you open the rule category groups, you will see which rule group contains the rule you added. There will be a + or a - symbol next to the name of the rule. Here, you can also read some information about each rule.
4. The Log only mode is indicated by this icon. If there is nothing here, the Challenge and greylist IP action is active
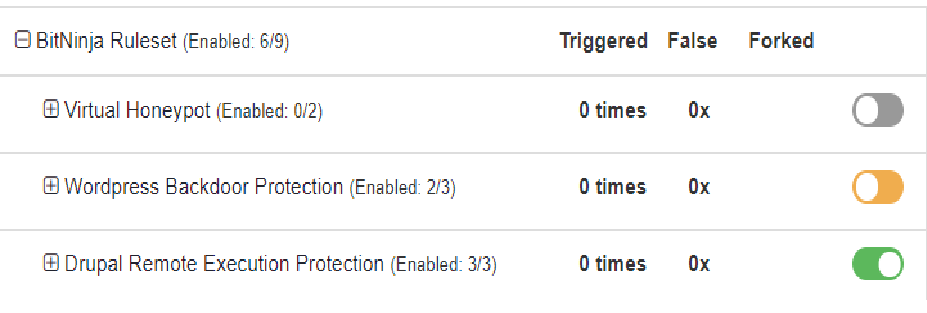
The switch icon at the rule groups’ name indicates the state of the rules in the group. If the color of the switch icon is grey, then there is no active rule in the rule group. If it is orange, then there is at least one active rule in the group. If all rules are enabled, the group’s switch icon will be green.
A false positive is when a user triggers the WAF 2.0 module with a harmless request. In the WAF module that is counted on every domain pattern that is set up under “False ”. False positives make your customers frustrated and unsatisfied with the service they get.
The number one cause of false positives that are generated by the WAF module is too many enabled rules.
In general, the acceptable false positive rate is a maximum of 2%. To minimize the false positives, we recommend using the Recommended ruleset on the “/” pattern. And if you would like to add rules, only add them on domains or pages, never to the whole server. And always enable the Log only mode to the domain pattern for a longer time period and check the logs about the domain WAF incidents under the Network Attacks menu point. If the number of false positives is acceptable, only then enable the Challenge and greylist IP mode on the Domain pattern.
You have the ultimate WAF 2.0 guide to use this powerful and flexible module, so with your newly acquired knowledge, use it to protect your server from hackers.
If you want to use the WAF module to protect your server, don’t hesitate to register and try the WAF 2.0 module and all the other BitNinja modules during the 7-day free trial period FOR FREE.
If you have questions or need help with something, our support ninjas are more than happy to help you. You can contact us via chat or via email.